Sunday, 25 March 2012

A little idea for mixing paints

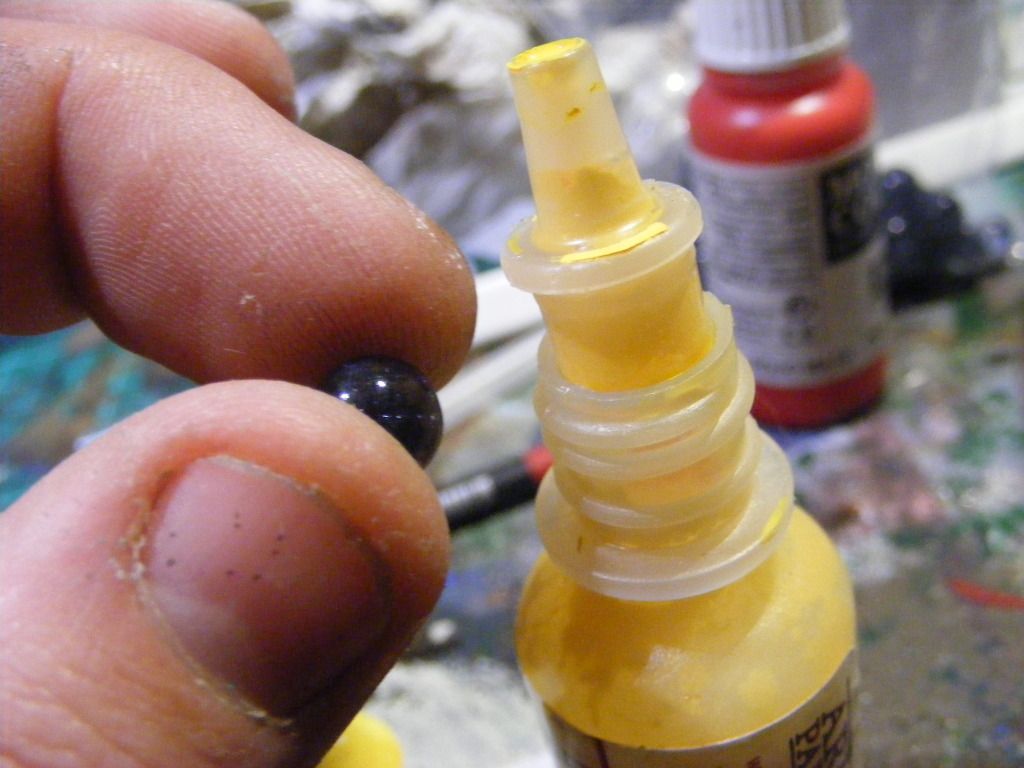
I can't remember where I got this idea from but it works rather well.  I am sure that many of you also have the occasional problem with paint that has separated a little and doesn't get better, even if you shake it for ages.  This simple idea can help out.

Get some little glass or metal beads and add them to the paint.  It's fairly easy to lift the top off a vallejo paint and pop it in.  From then on when you shake the paint it will act like the noisy rattle thingamejig in a spray can!

Saturday, 24 March 2012

The Horns of the Buffalo - Part Thirteen

I had a bit of a breakthrough last night.  Whilst rummaging in the vanishing cabinet for something I finally found the doors that I bought from 4Ground to finish the buildings.  A lick of paint and they're installed.  I'm rather pleased with the results and can't wait to get them deployed!  Just another hundred or so Zulus to finish first though.  Please excuse the lack of focus, my macro is playing up today.  However I am firmly convinced that these doors are worth every penny of the £4.50 + P&P as they really finish the buildings off nicely.


Part 1
Part 2
Part 3
Part 4
Part 5
Part 6
Part 7
Part 8
Part 9
Part 10


Friday, 23 March 2012

Quiet Friday Night In

The Memsahib has been despatched on a hen night.  The groom needed somewhere to go.  Guess what's happening?  Yes, I am finally getting an evening of gaming!!!

Sadly it's not 1938 or Zulus as I need to learn the rules for Flames of War for an event that the Station club is hosting in a few weeks time.  Still, at least it's chance to christen the roads and rivers!  Here's hoping that I don't lose to badly tonight!

War Memorial

At the weekend I found myself reading Wargames, Soldiers & Strategy for the first time.  Not a bad read at all.  However what really grabbed my attention was a review of a new War Memorial being produced by the Sgt's Mess.  I've never heard of these guys before but really liked the idea of adding a little more realism to my tabletop.  They are meant for 20mm rather than 28mm but I reckon that this will work just fine for 28mm.  I think that they sculpted it to look like a WW1 soldier so perfect for a Great War Memorial that might be found in any village or town around the country in 1938.

Another great thing about this manufacturer is their public support for Help for Heroes.  Other than that I only actually ordered the piece on Wednesday and yet it arrived here today!  The moulding was very neat and it took the paint pretty well.  I've tried to represent a weathered bronze statue.  Here's a few piccies of the piece before and after painting.


The Horns of the Buffalo - Part Twelve

After finally finishing the buildings yesterday I was at a bit of a loss as to what to paint as the lead mountain is rather large at the moment.  As the wine went down I decided to have a go at some of the British characters that I had undercoated and waiting for paint.  Considering that by the time I finished I was very much worse for the wine they are ok.

I did discover though that the static grass applicator is not much use with metal miniatures as every time it comes close enough to the miniature to make the grass stand up sparks start flying!


Part 1
Part 2
Part 3
Part 4
Part 5
Part 6
Part 7
Part 8
Part 9
Part 10

Thursday, 22 March 2012

The Horns of the Buffalo - Part Eleven

A most productive afternoon.  Having grown bored of painting bits of our new van and more than a little light headed I decided to crack on with the hospital.  Considering that painting the bricks demands a steady hand and I don't have one the overall effect is ok.  I'd love to have been able to simply drybrush the bricks on but the way that the mortar is cut into the MDF this is not possible which means that the paint job is a lot more paintstaking than I'd normally like.  I have got the extra doors etc to do still but I've lost them somewhere in the vanishing cabinet.


Now to decide on what to paint next, the Heroes of Rorkes Drift stand out but there's also a lot more Zulus and British Infantry to be done, or my recent large acquisition of Musketeer miniatures or the British 7 Pounder & crew.  So many miniatures and so little time!


Part 1
Part 2
Part 3
Part 4
Part 5
Part 6
Part 7
Part 8
Part 9
Part 10

Monday, 19 March 2012

The Horns of the Buffalo - Part Ten

I bet some of you were thinking that I had abandoned the Anglo-Zulu war in favour of scenics.  Well I did take a bit of a break to make my roads and rivers and I was seriously tempted to spend some of this week's leave making a graveyard.  Then I noticed that the recently tidied vanishing cabinet is still full on the middle shelf because of the undercoated Rorke's Drift buildings.  So I decided that I'd get them finished.  It's taken most of the day but the storehouse is now finished.  Painting the bricks was incredibly dull and made worse by a fearsome hangover this morning.  All I've got left to do now is to find an excuse to use it in 1938 VBCW as well as the Anglo Zulu war!  Anyway, enough rambling, here's the picture:


Part 1
Part 2
Part 3
Part 4
Part 5
Part 6
Part 7
Part 8
Part 9
Part 10

Sunday, 11 March 2012

Rivers - part one

The road project has been followed by a river project.  The techniques used were rather similar to those used for the roads although there were a few subtle differences as I have a new toy - a static grass applicator

1.  I used the same flooring but used wider pieces to allow this to look like a small river rather than a stream.  I built up the banks using the same pre mixed filler and then textured them with the same mix of powder and coral sand as I'd used for the roads.

2.  I sprayed everything black and then painted it brown.  I soon ran out of the original brown poster paint that I'd mixed for the roads so swapped to an emulsion tester pot that I'd found at the local Homebase that was pretty much the same colour.  This had a much stronger pigment so went over the black undercoat better.  I then drybrushed with English Uniform followed by German Camo Beige.

3.  I really struggled to get the water colour right.  Real rivers aren't blue although wargames ones often seem to be!  Eventually I settled on a very dark blue/brown colour.  It's not that true to life but seems to work ok.  I deliberatly slightly undermixed the paint to give it a very subtly streaky effect to leave the colour less solid. 

4.  The whole pieces were then sprayed with Army Painter Matt Varnish.


5.  I then changed the technique slightly.  I covered so areas with my normal basing mix but move of the pieces were covered using my new static grass applicator.  This is a brilliant tool and I think that the effect achieved is great.  Basically it makes the static grass stand up on end.  Noch make one for over £100 that I am sure is excellent but it is out of my price range!  I got mine off ebay for less than a fifth of that figure but it's worth every penny.  Basically it is an electric fly swat with a tea strainer on the end.  This charges the static grass so that it stands on end when it lands on the piece.  The only snag is that it emitts a high pitch squeal when in use that our cats and African Pygmy Hedgehog dislike so I have to use it in another room.

6.  Obviously at this point the water looked far too matt so I added a layer of Army Painter Strong Tone Quick Shade dip.  This gave a lovely effect with it's own colour although I might still add another layer of clear gloss varnish as it's not as shiny as say the liquid water effect that I've used elsewhere.  The bridge is from PMC Games.


7.  The final task was to add some extra texture to the surface of the water in the places where it would be flowing faster.  I did this using Woodland Scenics Water Effects.  I've had this in the cupboard for years and never tried using it.  It went on well but it'll be another 24 hours before I get to see whether or not it looks any good.

Saturday, 3 March 2012

Roads - Part 5 - The End of the road?

I am pleased to say that the road project is finished!  Well, sort of.  Firstly, I've made a start on some rivers, which by their very nature need to tie into the roads.  Firstly they will need to be forded by the roads and secondly I have a couple of road bridges from the very talented PMC games that will cross the river at a couple of points.  Once all that is done then I'd like to add a couple of sections to the road that have a pavement to represent the road going through the village.  However, that is likely to be months away if I even ever get round to it at all!  At some point I need to get back to some Zulu goodness.

Anyway, here's a few shots of the roads.  They've not turned out how I envisaged but they're good enough I think.  Well, it's academic if not as this is as good as I can do!


I'm was thinking that I might need to add another junction and maybe another road end, but then I found a junction that I had painted and not yet flocked so there is one more piece than shown above.

A little bit of close up detail:


One of the junctions:


Unfortunately Lt Grubber decided to drive his little tank down the road and showed that it is actually a rather narrow track.  Maybe I'll need to make a second wider batch at a later date.


So that's it for roads for a while.  The rivers should be along soon.  If I get to work in the vanishing cabinet and ignore the list of jobs that my darling wife has left me!

Roads - Part 1

Roads - Part 2

Roads - Part 3

Roads - Part 4

Roads - Part 5 - The End of the Road?

Friday, 2 March 2012

The Vanishing Cabinet

It's Friday night, I've spent most of the day van shopping for the wife before getting a couple of hours on the roads project.  I want to finish that one but acrylic water effect stuff takes an age to dry!  I then even based up a load of miniatures that were sitting around.  I was going to try talking to the wife but she's engrossed in some awful TV programme.  Instead I'd thought that I'd let you see where the chaos and occasional creation takes place, the Vanishing Cabinet.  It is so called because my wife can make anything of mine from around the house vanish by shoving it in there!


It's just a bog basic Ikea corner desk unit thingy but it does me proud.  Of course, if you think that it is a little chaotic then you should check out the miniature cupboard!


I really should work out why the display cases are misaligned by about 5 degrees!

Hopefully I'll finish the roads project tomorrow and get photos up by the end of the weekend.  Right now I'm going to try to work out how to make some halfway decent rivers!

Tuesday, 21 February 2012

Roads - Part 4

A slightly earlier finish than expected and a complete lack of motivation to do any PT mean that I actually got chance to finish off a couple of pieces tonight.  Two straights and two curves to be precise. 

Firstly I applied my standard basing flock down the sides, trying to avoid straight lines as much as possible to keep things looking natural.


The next stop was to add some extra tufts to add a little depth.  After this I decided to brave trying out the Vallejo Acrylic water that has been loitering at the back of the vanishing cabinet for many, many months.  I mixed in a little Devlan Mud wash, to try to make it look a bit murky, this stuff doesn't mix that easily really but the effect looks ok at the moment.  This photo was taken just after I added it. 


I might just return to the old faithful water effect of some PVA glue mixed in with some dirty brush cleaning water if it doesn't work out!  I often why I buy all these fancy new potions when the old tricks are often the best!

I'm reasonably happy with the finished pieces, I'll try to upload some fully finished pictures tomorrow when the water effect drys.  There's a fair few more pieces to do so hopefully I'll get them looking better by the end.  My dream is that one day I will be able to lay out my scenery like that photo that some people might remember from the rule book for Warhammer Fantasy Battle back at the beginning of the nineties, you know, the hardback orange 3rd edition one.  In the early chapters I remember a rather cheesy picture of Rick Priestley picking out some miniatures and a page or two later there was an incredible wargames table covered in scenery.  One day I will have a table to compete with that one!  One day . . . .. . .

Roads - Part 1

Roads - Part 2

Roads - Part 3

Roads - Part 4

Roads - Part 5 - The End of the Road?

Monday, 20 February 2012

Roads - Part 3

Well I made a little progress tonight, less than I hoped but some all the same.  A couple of the pieces were now sufficiently brown that I could overbrush a little English Uniform and German Camo Biege to make things a little more interesting.  It's cheered me up a tad as I wasn't really happy at all with project until then.  Since taking these photos I have sprayed the pieces with the good old anti-shine varnish so that I can hopefully get some flock along the sides tomorrow and maybe even get to play with adding muddy water to the puddles/pot holes the day after.  That's the plan, it'll probably not turn out like that!

Sorry about the focus, having a bad camera day!

This is one of the small curves that I've coloured up resting on top of a couple of as yet untouched straights.


Hopefully getting some flock etc on there will get things looking better soon.  Next update as soon as I have something to update!

Roads - Part 1

Roads - Part 2

Roads - Part 3

Roads - Part 4

Roads - Part 5 - The End of the Road?

Sunday, 19 February 2012

Roads - Part 2

Well I'm glad that I ran a little ahead with a test run.  It turns out that the pigments in the kids paints are really, really weak.  So weak that the brown was drying to almost black over the black undercoat.  So, the originals have been re-undercoated with white spray and then painted brown again.  It's cost me a few hours progress and a bit of detail with all of those layers of paint.  However, hopefully things will progress more soon.  We've got guests this afternoon so it may be next weekend before I can make much progress on this project.  With a little luck I might be able to get through the base coating during the evenings this week. 

Currently my road set consists of:

  • 6 12" straights
  • 2 16" straights (the bits left over)
  • 2 short ends for cul de sac type things
  • 1 90 degree bend
  • 4 45 degree bends
  • 2 t junctions
  • 1 cross roads
  • 1 Y junction
Hopefully this will be enough to fulfil my needs!


Roads - Part 1

Roads - Part 2

Roads - Part 3

Roads - Part 4

Roads - Part 5 - The End of the Road?

Saturday, 18 February 2012

Walls by 4Ground

Can you guess that the wife is insisting that I spend the evening on the sofa with her and not huddled up in the vanishing cabinet?  I should explain that the vanishing cabinet is our name for my paint station, more to follow later!

Anyway, I was massivly tempted by a deal offered by Warlord Games for their walls but wasn't sure that it was that good in terms of value for money.  So I looked at the 4Ground website and decided to go with them instead as I've been really impressed by the items that they made in the Horns of the Buffalo set

These are going to take quite some time to finish properly but assembly literally only took about 40 minutes for 3 sets.  I got 2 long wall sets and 1 short wall set for £25 plus P&P which I believe to be a rather splendid deal!  The material quality is excellent.  I will let you decide for yourselves as to whether or not you like the appearance, but I love it!  Pieces can be removed to simulate damage, during a game if required. 

Am I mad or are these items as good as I think they are?


What to do when your shotgun barrels fall off!

As some of the chaps on the Gentlemen's Wargames Parlour may be aware, I recently lucked in with a massive lot of Musketeer Miniatures.  Well, sadly one of the chaps lost the barrels off his shotgun in transit.  This rather explains the look of shock and fear on his face!


The barrels were still there but needed re-attaching and I didn't get round to doing this until after I received my order from Company B miniatures for some Lewis guns and Vickers K guns.  Can you see where this is going yet?

Suffice to say, the Longhoughton Defence Volunteers have just gained an LMG!  I've still got some gap filling to do but I'm actually rather pleased with the result as I am not good at conversions, I'm not brave enough, I prefer to stick with my comfort zone painting the miniatures rather than attacking them with the razor saw!


It seems that the look of shock and fear has turned into the shout of "go forth and procreate you illegitemate communist types"!

Roads - Part 1

Last week I went through some of my scenery collection and noticed that I had no roads or rivers.  I had plenty of buildings (well enough, I don't think that you can ever have too many) and lots of fences and walls.  Lots of little features such as a fuel dump, but no roads or rivers.  I resolved to get this sorted during my week off.  Then immediatly got distracted by numerous other tasks and social commitments. 

However, I did manage to order some bits and pieces to have a go at making this and even found my old book of How to Make Wargames Terrain.  I did consider following the guide in the book, but the materials were quite expensive so instead I consulted the Oracle of ideas that is the Wilkinson's website!

On Wednesday the materials that I didn't already have arrived and I promptly continued to fail to get anything done!  Anyway, the materials being used are:

  • Self adhesive vinyl floor planks as the base.
  • Ready mixed filler for texture
  • Ready mixed childrens paint (too expensive to use citadel or vallejo).
  • Double sided sticky tape (no idea what for but it seemed like a good idea)
  • Coral sand
  • Fine flocking powder for texture
  • Black spray
  • Brushes
  • PVA glue
  • My normal grass texture mix
I was aiming to produce step by step photos but kept forgetting to take them!  However, I've more or less kept a record over the various pieces.  Here's what I've done:

1.  Cut the vinyl to size and remove the backing to expose the adhesive.


2.  Add filler to the piece to create a slight camber.


3.  Roughly add some track marks and some potholes - I'm aiming to recreate Northumbrian roads in 1938 and can't believe that there'd be any less potholes than there are now!


4.  Sprinkle coral sand along the edges.  I have a fair amount of this around the house as I keep saltwater tropical fish.  The aim is to simulate the larger rocks and stones that would over time be moved to the edges and verges of the road.  I then sprinkles a finer texture powder over the whole piece and left it to dry.


The filler probably needs about 10-12 hours to dry but I've left it overnight before spraying the piece black.  This will hopefully help a bit by adding extra grip to any loose bits of texture.

As with most projects I have run ahead with one or two bits just to prove the process. 

5.  Once the filler was dry and the spray set I mixed up a suitable brown from the red and green kids paint that I got.  I have to say that the pigment content is somewhat lower than in good old Vallejo, but that probably helps to get it out of kids clothes!

Part 2 will hopefully come along tomorrow, once I've drunk my fill of fermented grapes tonight and recovered in the morning!


Roads - Part 1

Roads - Part 2

Roads - Part 3

Roads - Part 4

Roads - Part 5 - The End of the Road?

Friday, 17 February 2012

Trees - Citadel Woods for use with historical games?

Whilst rummaging through the cupboards the other day I came across the sprues to make up two examples of the Citadel Woods.  So I spent some time painting them and a lot more time covering up all signs of the incredible number of skulls that Games Workshop feel the need to put everywhere.

They're pretty much finished now but I'm not sure whether or not they would be suitable for historical games or 1938 VBCW.  Any thoughts chaps?


Tuesday, 14 February 2012

Dwarf King's Hold - Dead Rising - Review

Last night I was fortunate enough to have the chance to play a couple of games of Dwarf Kings Hold - Dead Rising with my good friend Mark.  We played the 1st scenario twice, each playing both sides.  We probably would have played for longer but the Memsahib's were getting bored and we were getting pretty drunk so we stopped there. 

I was pretty impressed by the whole game.  The only real criticism is that the miniatures don't come with the bases that they need.  For the sake of a few pence Mantics have left things a little incomplete in my humble opinion. 

This is overall a very good game.  It's good value for money and fun without the overly complex gameplay of say Dreadfleet.  I'd watched the gameplay demo on Beasts of War during the day and by the end of the first game we had a good grasp of the mechanism.  It works rather well.  It was interesting that the Undead were victorious in both games.  However, I reckon that the Dwarves could have won, we were both a bit unlucky whilst playing the stunty side.

I still need to be convinced that elves and orcs have a place to play in a dungeon game but I will be adding the Green Menace to my wishlist with the rather excellent Wayland Games.  Oh and then I'll probably also buy the 3rd game in the series too.  I won't be rushing out for these but I certainly wouldn't be upset if they arrived for my Birthday or Christmas!  I probably won't buy the dungeon monsters pack though as I reckon I have enough of those miniatures knocking around the house to not need this particular set.


Sunday, 12 February 2012

Fences

I picked these up an age ago from Warlord Games.  I'm not sure whether or not they are the manufacturer but they are really lovely pieces.  I finally got round to texturing the base tonight so thought that I might post a couple of pictures.  They work in really well with the walls from the Horns of the Buffalo set too.


Saturday, 11 February 2012

Dwarf King's Hold - Dead Rising

One very unexpected Christmas present last year was the Dwarf King's Hold - Dead Rising.  Unfortunately I've been snowed under with Zulus for the last couple of months.  However, I'm hopefully getting a day of gaming with a good friend on Monday where the main objective is to finally fathom out the rules for Dreadfleet (being sober might help) with this coming up I thought that this was the perfect excuse to get the Dwarf King's Hold painted up as the thought of playing with unpainted miniatures doesn't bear thinking!

Anyway, I've watched a few videos about this game series on Beasts of War and it looks to be a cracking fast play game.  Here's what my little lot looks like, for once I'm reasonably happy with them, it was refreshing to be doing fantasy and be able to go that little bit more OTT: