Saturday 18 February 2012

Walls by 4Ground

Can you guess that the wife is insisting that I spend the evening on the sofa with her and not huddled up in the vanishing cabinet?  I should explain that the vanishing cabinet is our name for my paint station, more to follow later!

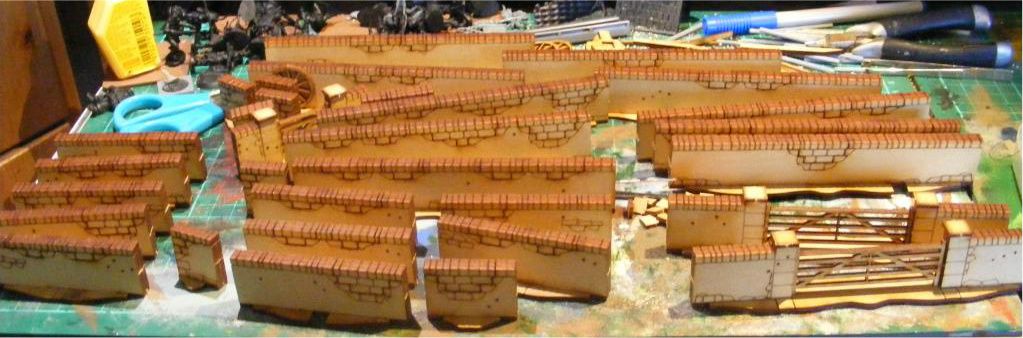
Anyway, I was massivly tempted by a deal offered by Warlord Games for their walls but wasn't sure that it was that good in terms of value for money.  So I looked at the 4Ground website and decided to go with them instead as I've been really impressed by the items that they made in the Horns of the Buffalo set

These are going to take quite some time to finish properly but assembly literally only took about 40 minutes for 3 sets.  I got 2 long wall sets and 1 short wall set for £25 plus P&P which I believe to be a rather splendid deal!  The material quality is excellent.  I will let you decide for yourselves as to whether or not you like the appearance, but I love it!  Pieces can be removed to simulate damage, during a game if required. 

Am I mad or are these items as good as I think they are?


What to do when your shotgun barrels fall off!

As some of the chaps on the Gentlemen's Wargames Parlour may be aware, I recently lucked in with a massive lot of Musketeer Miniatures.  Well, sadly one of the chaps lost the barrels off his shotgun in transit.  This rather explains the look of shock and fear on his face!


The barrels were still there but needed re-attaching and I didn't get round to doing this until after I received my order from Company B miniatures for some Lewis guns and Vickers K guns.  Can you see where this is going yet?

Suffice to say, the Longhoughton Defence Volunteers have just gained an LMG!  I've still got some gap filling to do but I'm actually rather pleased with the result as I am not good at conversions, I'm not brave enough, I prefer to stick with my comfort zone painting the miniatures rather than attacking them with the razor saw!


It seems that the look of shock and fear has turned into the shout of "go forth and procreate you illegitemate communist types"!

Roads - Part 1

Last week I went through some of my scenery collection and noticed that I had no roads or rivers.  I had plenty of buildings (well enough, I don't think that you can ever have too many) and lots of fences and walls.  Lots of little features such as a fuel dump, but no roads or rivers.  I resolved to get this sorted during my week off.  Then immediatly got distracted by numerous other tasks and social commitments. 

However, I did manage to order some bits and pieces to have a go at making this and even found my old book of How to Make Wargames Terrain.  I did consider following the guide in the book, but the materials were quite expensive so instead I consulted the Oracle of ideas that is the Wilkinson's website!

On Wednesday the materials that I didn't already have arrived and I promptly continued to fail to get anything done!  Anyway, the materials being used are:

  • Self adhesive vinyl floor planks as the base.
  • Ready mixed filler for texture
  • Ready mixed childrens paint (too expensive to use citadel or vallejo).
  • Double sided sticky tape (no idea what for but it seemed like a good idea)
  • Coral sand
  • Fine flocking powder for texture
  • Black spray
  • Brushes
  • PVA glue
  • My normal grass texture mix
I was aiming to produce step by step photos but kept forgetting to take them!  However, I've more or less kept a record over the various pieces.  Here's what I've done:

1.  Cut the vinyl to size and remove the backing to expose the adhesive.


2.  Add filler to the piece to create a slight camber.


3.  Roughly add some track marks and some potholes - I'm aiming to recreate Northumbrian roads in 1938 and can't believe that there'd be any less potholes than there are now!


4.  Sprinkle coral sand along the edges.  I have a fair amount of this around the house as I keep saltwater tropical fish.  The aim is to simulate the larger rocks and stones that would over time be moved to the edges and verges of the road.  I then sprinkles a finer texture powder over the whole piece and left it to dry.


The filler probably needs about 10-12 hours to dry but I've left it overnight before spraying the piece black.  This will hopefully help a bit by adding extra grip to any loose bits of texture.

As with most projects I have run ahead with one or two bits just to prove the process. 

5.  Once the filler was dry and the spray set I mixed up a suitable brown from the red and green kids paint that I got.  I have to say that the pigment content is somewhat lower than in good old Vallejo, but that probably helps to get it out of kids clothes!

Part 2 will hopefully come along tomorrow, once I've drunk my fill of fermented grapes tonight and recovered in the morning!


Roads - Part 1

Roads - Part 2

Roads - Part 3

Roads - Part 4

Roads - Part 5 - The End of the Road?