Last week I went through some of my scenery collection and noticed that I had no roads or rivers. I had plenty of buildings (well enough, I don't think that you can ever have too many) and lots of fences and walls. Lots of little features such as a fuel dump, but no roads or rivers. I resolved to get this sorted during my week off. Then immediatly got distracted by numerous other tasks and social commitments.
However, I did manage to order some bits and pieces to have a go at making this and even found my old book of How to Make Wargames Terrain. I did consider following the guide in the book, but the materials were quite expensive so instead I consulted the Oracle of ideas that is the Wilkinson's website!
On Wednesday the materials that I didn't already have arrived and I promptly continued to fail to get anything done! Anyway, the materials being used are:
1. Cut the vinyl to size and remove the backing to expose the adhesive.
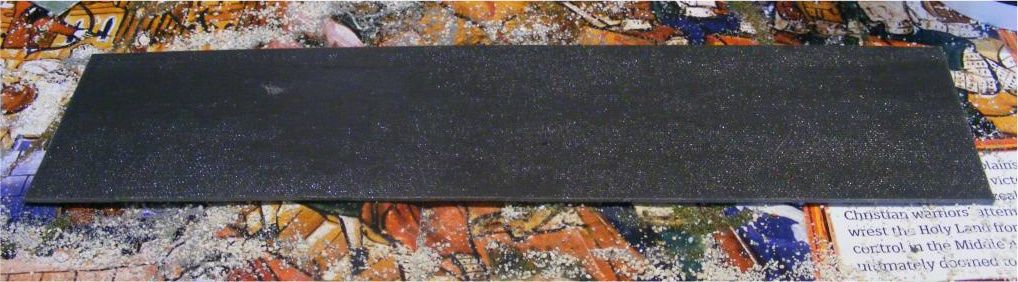
2. Add filler to the piece to create a slight camber.

3. Roughly add some track marks and some potholes - I'm aiming to recreate Northumbrian roads in 1938 and can't believe that there'd be any less potholes than there are now!

4. Sprinkle coral sand along the edges. I have a fair amount of this around the house as I keep saltwater tropical fish. The aim is to simulate the larger rocks and stones that would over time be moved to the edges and verges of the road. I then sprinkles a finer texture powder over the whole piece and left it to dry.

The filler probably needs about 10-12 hours to dry but I've left it overnight before spraying the piece black. This will hopefully help a bit by adding extra grip to any loose bits of texture.
As with most projects I have run ahead with one or two bits just to prove the process.
5. Once the filler was dry and the spray set I mixed up a suitable brown from the red and green kids paint that I got. I have to say that the pigment content is somewhat lower than in good old Vallejo, but that probably helps to get it out of kids clothes!
Part 2 will hopefully come along tomorrow, once I've drunk my fill of fermented grapes tonight and recovered in the morning!
Roads - Part 1
Roads - Part 2
Roads - Part 3
Roads - Part 4
Roads - Part 5 - The End of the Road?
However, I did manage to order some bits and pieces to have a go at making this and even found my old book of How to Make Wargames Terrain. I did consider following the guide in the book, but the materials were quite expensive so instead I consulted the Oracle of ideas that is the Wilkinson's website!
On Wednesday the materials that I didn't already have arrived and I promptly continued to fail to get anything done! Anyway, the materials being used are:
- Self adhesive vinyl floor planks as the base.
- Ready mixed filler for texture
- Ready mixed childrens paint (too expensive to use citadel or vallejo).
- Double sided sticky tape (no idea what for but it seemed like a good idea)
- Coral sand
- Fine flocking powder for texture
- Black spray
- Brushes
- PVA glue
- My normal grass texture mix
1. Cut the vinyl to size and remove the backing to expose the adhesive.
2. Add filler to the piece to create a slight camber.
3. Roughly add some track marks and some potholes - I'm aiming to recreate Northumbrian roads in 1938 and can't believe that there'd be any less potholes than there are now!
4. Sprinkle coral sand along the edges. I have a fair amount of this around the house as I keep saltwater tropical fish. The aim is to simulate the larger rocks and stones that would over time be moved to the edges and verges of the road. I then sprinkles a finer texture powder over the whole piece and left it to dry.
The filler probably needs about 10-12 hours to dry but I've left it overnight before spraying the piece black. This will hopefully help a bit by adding extra grip to any loose bits of texture.
As with most projects I have run ahead with one or two bits just to prove the process.
5. Once the filler was dry and the spray set I mixed up a suitable brown from the red and green kids paint that I got. I have to say that the pigment content is somewhat lower than in good old Vallejo, but that probably helps to get it out of kids clothes!
Part 2 will hopefully come along tomorrow, once I've drunk my fill of fermented grapes tonight and recovered in the morning!
Roads - Part 1
Roads - Part 2
Roads - Part 3
Roads - Part 4
Roads - Part 5 - The End of the Road?
Thats a great guide and I think I will give that a try. They are looking good too.
ReplyDeleteThanks but please don't start anything until I've sobered up and worked out what has gone wrong. Currently 3 coats of brown paint over a black undercoast, wait 30 minutes and it has turned black again!
ReplyDeleteI fear that the ready mixed filler is sucking all of the pigment out of the kids paint and firmly ignoring it. I've just splashed some brown across a piece without the black undercoat to see how that goes.
One other fear is that the vinyl might be too flexible for the filler which may result in cracking when things are set.
All that said, this is why I publish my findings - to ensure that others don't make the same mistakes!