Tuesday 21 February 2012

Roads - Part 4

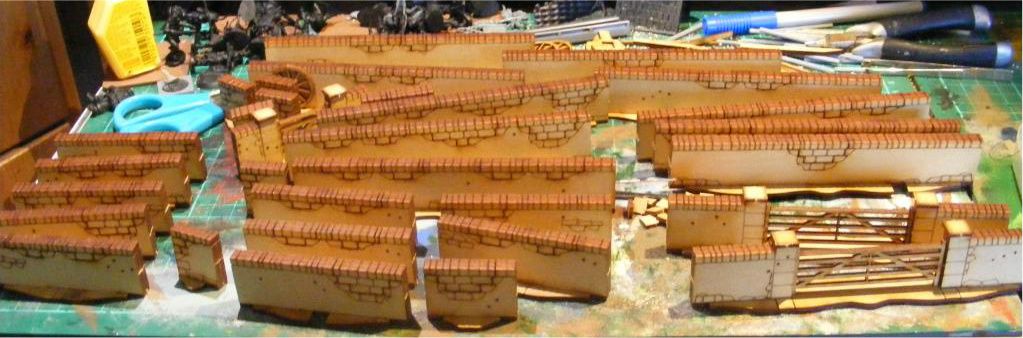
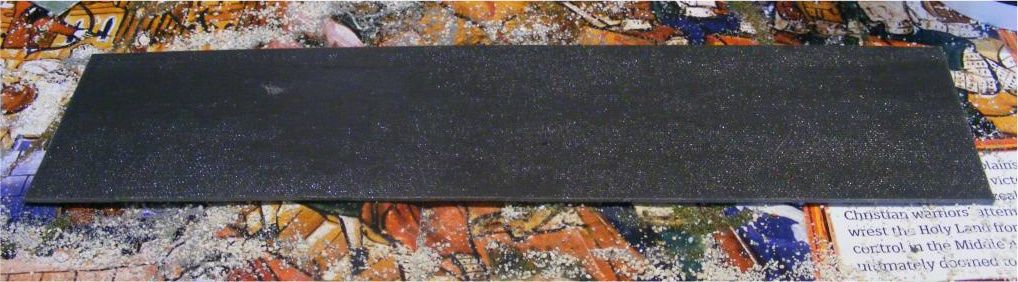
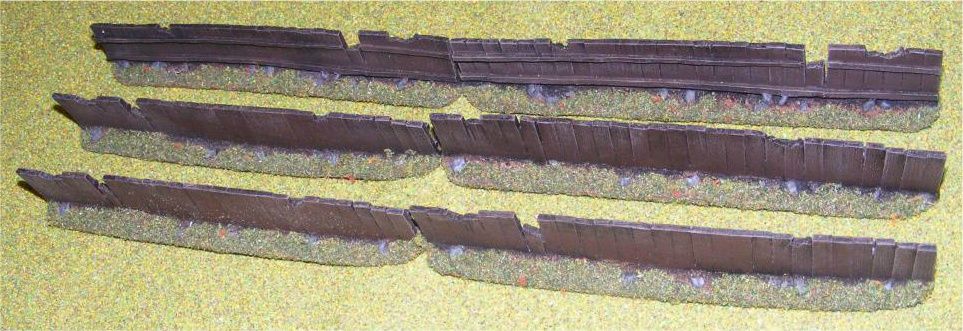
A slightly earlier finish than expected and a complete lack of motivation to do any PT mean that I actually got chance to finish off a couple of pieces tonight.  Two straights and two curves to be precise. 

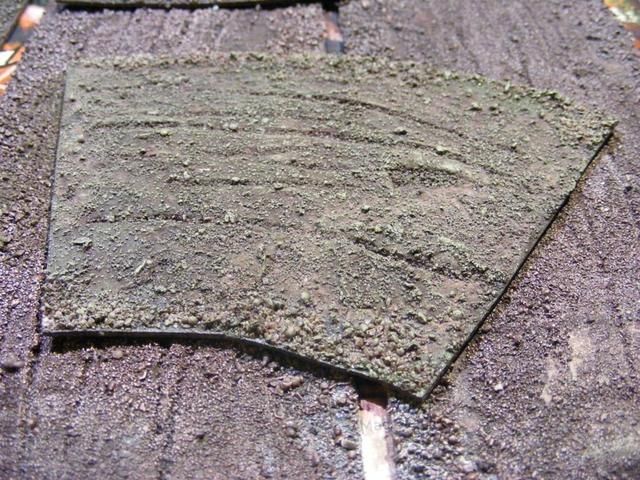
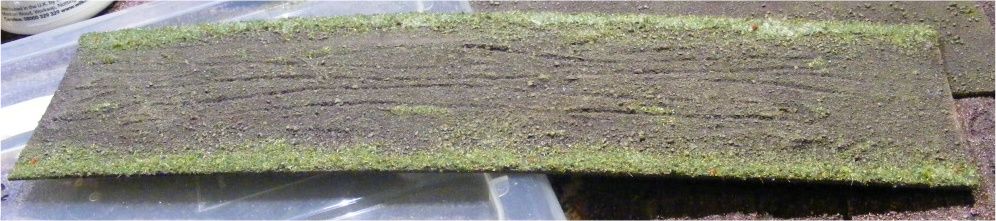
Firstly I applied my standard basing flock down the sides, trying to avoid straight lines as much as possible to keep things looking natural.


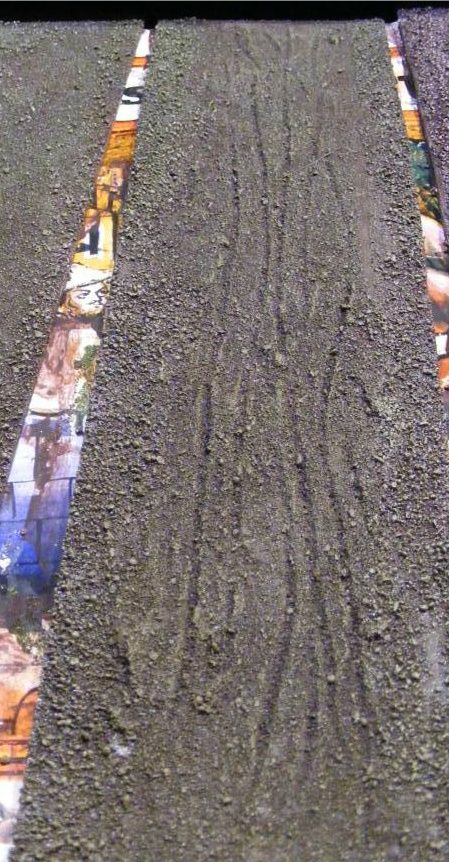
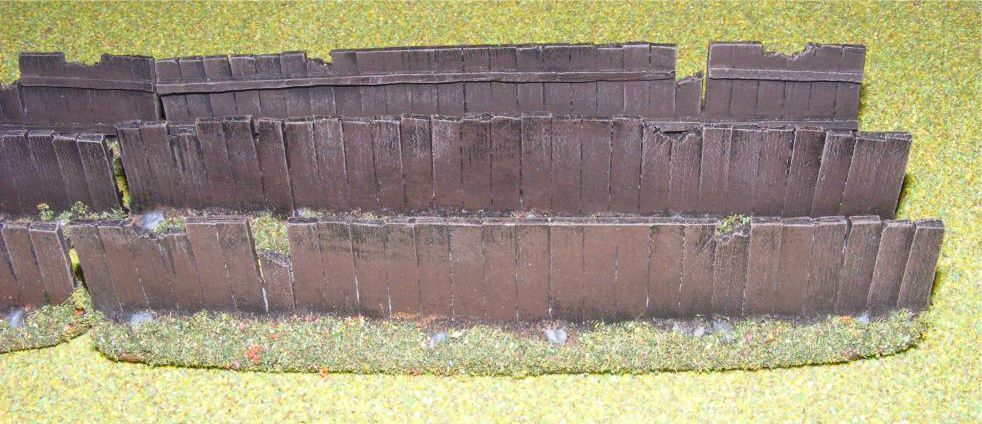
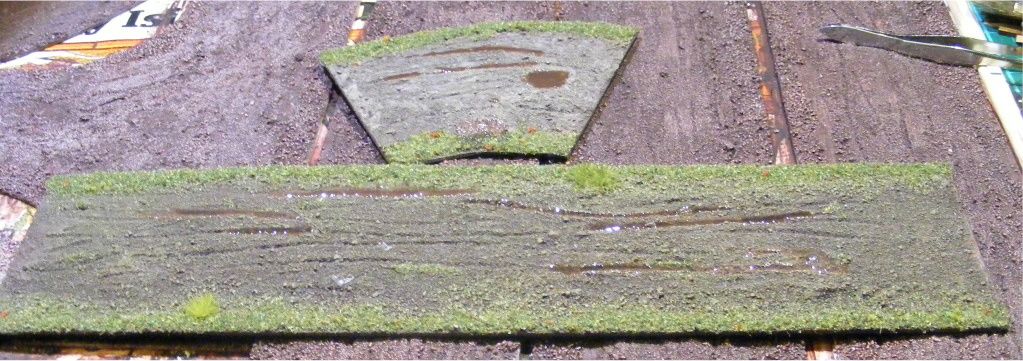
The next stop was to add some extra tufts to add a little depth.  After this I decided to brave trying out the Vallejo Acrylic water that has been loitering at the back of the vanishing cabinet for many, many months.  I mixed in a little Devlan Mud wash, to try to make it look a bit murky, this stuff doesn't mix that easily really but the effect looks ok at the moment.  This photo was taken just after I added it. 


I might just return to the old faithful water effect of some PVA glue mixed in with some dirty brush cleaning water if it doesn't work out!  I often why I buy all these fancy new potions when the old tricks are often the best!

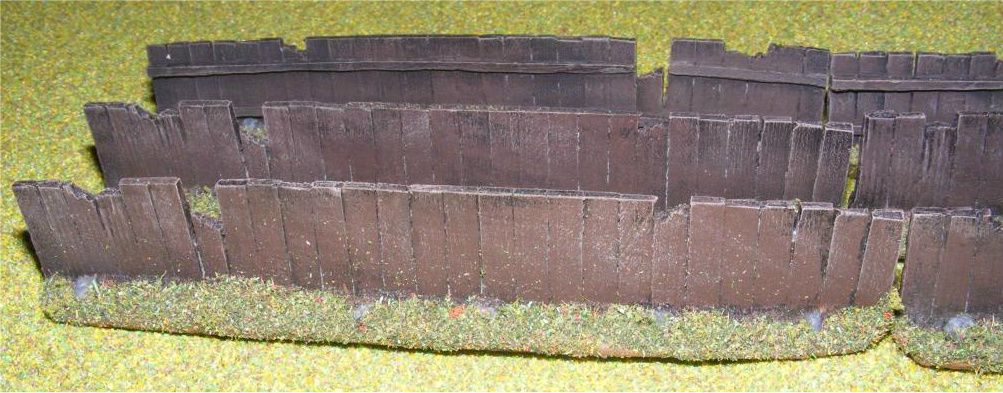
I'm reasonably happy with the finished pieces, I'll try to upload some fully finished pictures tomorrow when the water effect drys.  There's a fair few more pieces to do so hopefully I'll get them looking better by the end.  My dream is that one day I will be able to lay out my scenery like that photo that some people might remember from the rule book for Warhammer Fantasy Battle back at the beginning of the nineties, you know, the hardback orange 3rd edition one.  In the early chapters I remember a rather cheesy picture of Rick Priestley picking out some miniatures and a page or two later there was an incredible wargames table covered in scenery.  One day I will have a table to compete with that one!  One day . . . .. . .

Roads - Part 1

Roads - Part 2

Roads - Part 3

Roads - Part 4

Roads - Part 5 - The End of the Road?

Monday 20 February 2012

Roads - Part 3

Well I made a little progress tonight, less than I hoped but some all the same.  A couple of the pieces were now sufficiently brown that I could overbrush a little English Uniform and German Camo Biege to make things a little more interesting.  It's cheered me up a tad as I wasn't really happy at all with project until then.  Since taking these photos I have sprayed the pieces with the good old anti-shine varnish so that I can hopefully get some flock along the sides tomorrow and maybe even get to play with adding muddy water to the puddles/pot holes the day after.  That's the plan, it'll probably not turn out like that!

Sorry about the focus, having a bad camera day!

This is one of the small curves that I've coloured up resting on top of a couple of as yet untouched straights.


Hopefully getting some flock etc on there will get things looking better soon.  Next update as soon as I have something to update!

Roads - Part 1

Roads - Part 2

Roads - Part 3

Roads - Part 4

Roads - Part 5 - The End of the Road?

Sunday 19 February 2012

Roads - Part 2

Well I'm glad that I ran a little ahead with a test run.  It turns out that the pigments in the kids paints are really, really weak.  So weak that the brown was drying to almost black over the black undercoat.  So, the originals have been re-undercoated with white spray and then painted brown again.  It's cost me a few hours progress and a bit of detail with all of those layers of paint.  However, hopefully things will progress more soon.  We've got guests this afternoon so it may be next weekend before I can make much progress on this project.  With a little luck I might be able to get through the base coating during the evenings this week. 

Currently my road set consists of:

  • 6 12" straights
  • 2 16" straights (the bits left over)
  • 2 short ends for cul de sac type things
  • 1 90 degree bend
  • 4 45 degree bends
  • 2 t junctions
  • 1 cross roads
  • 1 Y junction
Hopefully this will be enough to fulfil my needs!


Roads - Part 1

Roads - Part 2

Roads - Part 3

Roads - Part 4

Roads - Part 5 - The End of the Road?

Saturday 18 February 2012

Walls by 4Ground

Can you guess that the wife is insisting that I spend the evening on the sofa with her and not huddled up in the vanishing cabinet?  I should explain that the vanishing cabinet is our name for my paint station, more to follow later!

Anyway, I was massivly tempted by a deal offered by Warlord Games for their walls but wasn't sure that it was that good in terms of value for money.  So I looked at the 4Ground website and decided to go with them instead as I've been really impressed by the items that they made in the Horns of the Buffalo set

These are going to take quite some time to finish properly but assembly literally only took about 40 minutes for 3 sets.  I got 2 long wall sets and 1 short wall set for £25 plus P&P which I believe to be a rather splendid deal!  The material quality is excellent.  I will let you decide for yourselves as to whether or not you like the appearance, but I love it!  Pieces can be removed to simulate damage, during a game if required. 

Am I mad or are these items as good as I think they are?


What to do when your shotgun barrels fall off!

As some of the chaps on the Gentlemen's Wargames Parlour may be aware, I recently lucked in with a massive lot of Musketeer Miniatures.  Well, sadly one of the chaps lost the barrels off his shotgun in transit.  This rather explains the look of shock and fear on his face!


The barrels were still there but needed re-attaching and I didn't get round to doing this until after I received my order from Company B miniatures for some Lewis guns and Vickers K guns.  Can you see where this is going yet?

Suffice to say, the Longhoughton Defence Volunteers have just gained an LMG!  I've still got some gap filling to do but I'm actually rather pleased with the result as I am not good at conversions, I'm not brave enough, I prefer to stick with my comfort zone painting the miniatures rather than attacking them with the razor saw!


It seems that the look of shock and fear has turned into the shout of "go forth and procreate you illegitemate communist types"!

Roads - Part 1

Last week I went through some of my scenery collection and noticed that I had no roads or rivers.  I had plenty of buildings (well enough, I don't think that you can ever have too many) and lots of fences and walls.  Lots of little features such as a fuel dump, but no roads or rivers.  I resolved to get this sorted during my week off.  Then immediatly got distracted by numerous other tasks and social commitments. 

However, I did manage to order some bits and pieces to have a go at making this and even found my old book of How to Make Wargames Terrain.  I did consider following the guide in the book, but the materials were quite expensive so instead I consulted the Oracle of ideas that is the Wilkinson's website!

On Wednesday the materials that I didn't already have arrived and I promptly continued to fail to get anything done!  Anyway, the materials being used are:

  • Self adhesive vinyl floor planks as the base.
  • Ready mixed filler for texture
  • Ready mixed childrens paint (too expensive to use citadel or vallejo).
  • Double sided sticky tape (no idea what for but it seemed like a good idea)
  • Coral sand
  • Fine flocking powder for texture
  • Black spray
  • Brushes
  • PVA glue
  • My normal grass texture mix
I was aiming to produce step by step photos but kept forgetting to take them!  However, I've more or less kept a record over the various pieces.  Here's what I've done:

1.  Cut the vinyl to size and remove the backing to expose the adhesive.


2.  Add filler to the piece to create a slight camber.


3.  Roughly add some track marks and some potholes - I'm aiming to recreate Northumbrian roads in 1938 and can't believe that there'd be any less potholes than there are now!


4.  Sprinkle coral sand along the edges.  I have a fair amount of this around the house as I keep saltwater tropical fish.  The aim is to simulate the larger rocks and stones that would over time be moved to the edges and verges of the road.  I then sprinkles a finer texture powder over the whole piece and left it to dry.


The filler probably needs about 10-12 hours to dry but I've left it overnight before spraying the piece black.  This will hopefully help a bit by adding extra grip to any loose bits of texture.

As with most projects I have run ahead with one or two bits just to prove the process. 

5.  Once the filler was dry and the spray set I mixed up a suitable brown from the red and green kids paint that I got.  I have to say that the pigment content is somewhat lower than in good old Vallejo, but that probably helps to get it out of kids clothes!

Part 2 will hopefully come along tomorrow, once I've drunk my fill of fermented grapes tonight and recovered in the morning!


Roads - Part 1

Roads - Part 2

Roads - Part 3

Roads - Part 4

Roads - Part 5 - The End of the Road?

Friday 17 February 2012

Trees - Citadel Woods for use with historical games?

Whilst rummaging through the cupboards the other day I came across the sprues to make up two examples of the Citadel Woods.  So I spent some time painting them and a lot more time covering up all signs of the incredible number of skulls that Games Workshop feel the need to put everywhere.

They're pretty much finished now but I'm not sure whether or not they would be suitable for historical games or 1938 VBCW.  Any thoughts chaps?


Tuesday 14 February 2012

Dwarf King's Hold - Dead Rising - Review

Last night I was fortunate enough to have the chance to play a couple of games of Dwarf Kings Hold - Dead Rising with my good friend Mark.  We played the 1st scenario twice, each playing both sides.  We probably would have played for longer but the Memsahib's were getting bored and we were getting pretty drunk so we stopped there. 

I was pretty impressed by the whole game.  The only real criticism is that the miniatures don't come with the bases that they need.  For the sake of a few pence Mantics have left things a little incomplete in my humble opinion. 

This is overall a very good game.  It's good value for money and fun without the overly complex gameplay of say Dreadfleet.  I'd watched the gameplay demo on Beasts of War during the day and by the end of the first game we had a good grasp of the mechanism.  It works rather well.  It was interesting that the Undead were victorious in both games.  However, I reckon that the Dwarves could have won, we were both a bit unlucky whilst playing the stunty side.

I still need to be convinced that elves and orcs have a place to play in a dungeon game but I will be adding the Green Menace to my wishlist with the rather excellent Wayland Games.  Oh and then I'll probably also buy the 3rd game in the series too.  I won't be rushing out for these but I certainly wouldn't be upset if they arrived for my Birthday or Christmas!  I probably won't buy the dungeon monsters pack though as I reckon I have enough of those miniatures knocking around the house to not need this particular set.


Sunday 12 February 2012

Fences

I picked these up an age ago from Warlord Games.  I'm not sure whether or not they are the manufacturer but they are really lovely pieces.  I finally got round to texturing the base tonight so thought that I might post a couple of pictures.  They work in really well with the walls from the Horns of the Buffalo set too.


Saturday 11 February 2012

Dwarf King's Hold - Dead Rising

One very unexpected Christmas present last year was the Dwarf King's Hold - Dead Rising.  Unfortunately I've been snowed under with Zulus for the last couple of months.  However, I'm hopefully getting a day of gaming with a good friend on Monday where the main objective is to finally fathom out the rules for Dreadfleet (being sober might help) with this coming up I thought that this was the perfect excuse to get the Dwarf King's Hold painted up as the thought of playing with unpainted miniatures doesn't bear thinking!

Anyway, I've watched a few videos about this game series on Beasts of War and it looks to be a cracking fast play game.  Here's what my little lot looks like, for once I'm reasonably happy with them, it was refreshing to be doing fantasy and be able to go that little bit more OTT:


Saturday 4 February 2012

The Percy Hunt - part 4

Well, it's been er, er, many months since I finished painting the Percy Hunt.  The only snag was that I hadn't based them up.  This is nothing unusual as I always procrastinate over basing, leaving it for far too long. Anyway, these chaps are finally finished.  They just need to get their first outing for a game now!

Wednesday 1 February 2012

The Horns of the Buffalo - Part Nine

I wonder how many parts there will eventually be to this saga!  Anyway, I've been laid up with that lovely winter vomitting bug for the last few days.  In between calls on the great white ivory telephone I've made a little progress on the project over the last few days.  I've managed to paint another 16 unmarried Zulus and their InDuna.  Just another 16 to go and that unit will be done giving me 3 completed units of Zulus (2 unmarried and 1 married) which leaves me with another 2 units of Married Zulus to build and paint and one more unit of Brits.  On the subject of Brits, I finished the plastics from the original set as well. 


I then noticed that my "standard" basing mix was running rather low.  I decided that I would make up a new mega batch of basing texture.  The only problem is that try as I might, it doesn't match what I've been using so there will be a subtle difference next time I return to 1938 VBCW.  Some of you might think that it is far too green for the terrain of Zulu land but actually the battle of Rorkes Drift took place during the wet season and so was far more green and lush than the films lead us to believe.  This also has the added benefit that the scenery will be able to "double hat" for other periods such as 1938!  I'm not entirely happy with the colour but it'll have to do now that it's started going onto the masses!


I was also wondering what to do with all of those spare shields on the sprues.  I contemplated attaching them to the back of the musket wielding chaps but when playing around this just looked plain wrong.  After starting to work through the brilliant Black Powder rules I realised that I was going to need casualty markers and lots of them!  I've got to work out what to use for the Brits now . . . . .


Other than that it's just been tidying up loose ends and finally moving some of this massive set through to the display cases as the vanishing cabinet was choc a bloc with stuff.  I'm in the process of getting rid of the last bits of my fantasy collection on Ebay which has finally created a bit of space for this lot.  Anyway, I'd better get back to basing while I'm on a roll.  I really hate basing, I wish that I could do it as well as PanzerKaput does!

As a parting thought, is it any suprise that this chap is looking away from where his musket is pointing when the barrel is as wonky as this?


Hopefully I'll be back in work tomorrow.  The combination of the Falklands trip and 3 days sick means that my backlog of work is going to be horrific!


Part 1
Part 2
Part 3
Part 4
Part 5
Part 6
Part 7
Part 8
Part 9
Part 10